Description
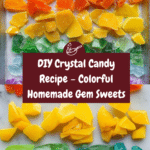
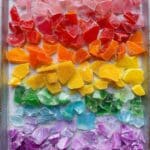
This Crystal Candy recipe creates beautiful, gem-like candies using agar agar, sugar, and your choice of flavorings and colors. Perfect for a unique homemade treat, these candies are firm yet slightly sticky with a stunning crystalline appearance formed through a simple cooling and crusting process.
Ingredients
Scale
Main Ingredients
- 1 ⅔ cups water
- 3 teaspoons agar agar powder
- 3 cups granulated sugar
- ¼ teaspoon flavoring of choice
- 1–3 drops liquid food coloring (as desired)
Instructions
- Preparation Setup: Before starting, gather all ingredients and prepare small containers by lightly greasing them. Arrange your flavorings and food coloring nearby because the candy sets quickly after cooking.
- Soak Agar Agar: Add the water to a small pot, sprinkle the agar agar powder over it, stir gently, and let the mixture stand for 5 minutes to hydrate the agar.
- Boil Mixture: Bring the water and agar agar to a boil and let it boil for 3 minutes. Then add the granulated sugar, stir until dissolved, reduce heat, and simmer for an additional 2-3 minutes to ensure full incorporation.
- Divide & Flavor: Remove the pot from heat and quickly pour the hot candy liquid into the prepared containers. Add about ¼ teaspoon total of your chosen flavoring in small amounts per container to avoid overpowering, and add food coloring drops as desired.
- Swirl Colors and Flavors: Use a toothpick or wooden skewer to gently swirl the flavoring and coloring throughout the candy for a marbled crystal effect.
- Chill to Set: Cover the containers and refrigerate for 1-2 hours until the candy is firm but still slightly sticky.
- Demold and Cut: Use a knife to carefully pop the candy out onto a cutting board in one piece. Cut into desired shapes with a paring knife, trimming or beveling edges to enhance the crystal-like appearance. Gather scraps to form additional clusters if desired.
- Dry and Crust: Lay candy pieces on parchment-lined baking sheets and store in a cool, dry place for 5-7 days, rotating periodically to ensure all surfaces develop a crust. Covering the candy will slow this crusting process.
- Decorate (Optional): Once completely crusted, embellish your crystal candies with edible gold luster dust or gold leaf for a luxurious finish.
Notes
- Work quickly when pouring and flavoring the candy as it begins to set rapidly after cooking.
- Use light layers of flavoring to avoid overwhelming the sweet base.
- The crusting process is essential for the final texture and appearance of the candies.
- Store candies in a cool dry place rather than the refrigerator after initial setting to allow proper crust formation.
- Edible gold dust or gold leaf is optional but adds an elegant touch.
- Prep Time: 10 minutes
- Cook Time: 10 minutes
- Category: Candy
- Method: Stovetop
- Cuisine: International
Keywords: crystal candy, agar agar candy, homemade candy, gem candy, flavored crystal candy, sugar candy, colorful candy