
Cast Iron Skillet Cherry Danish Recipe
Introduction
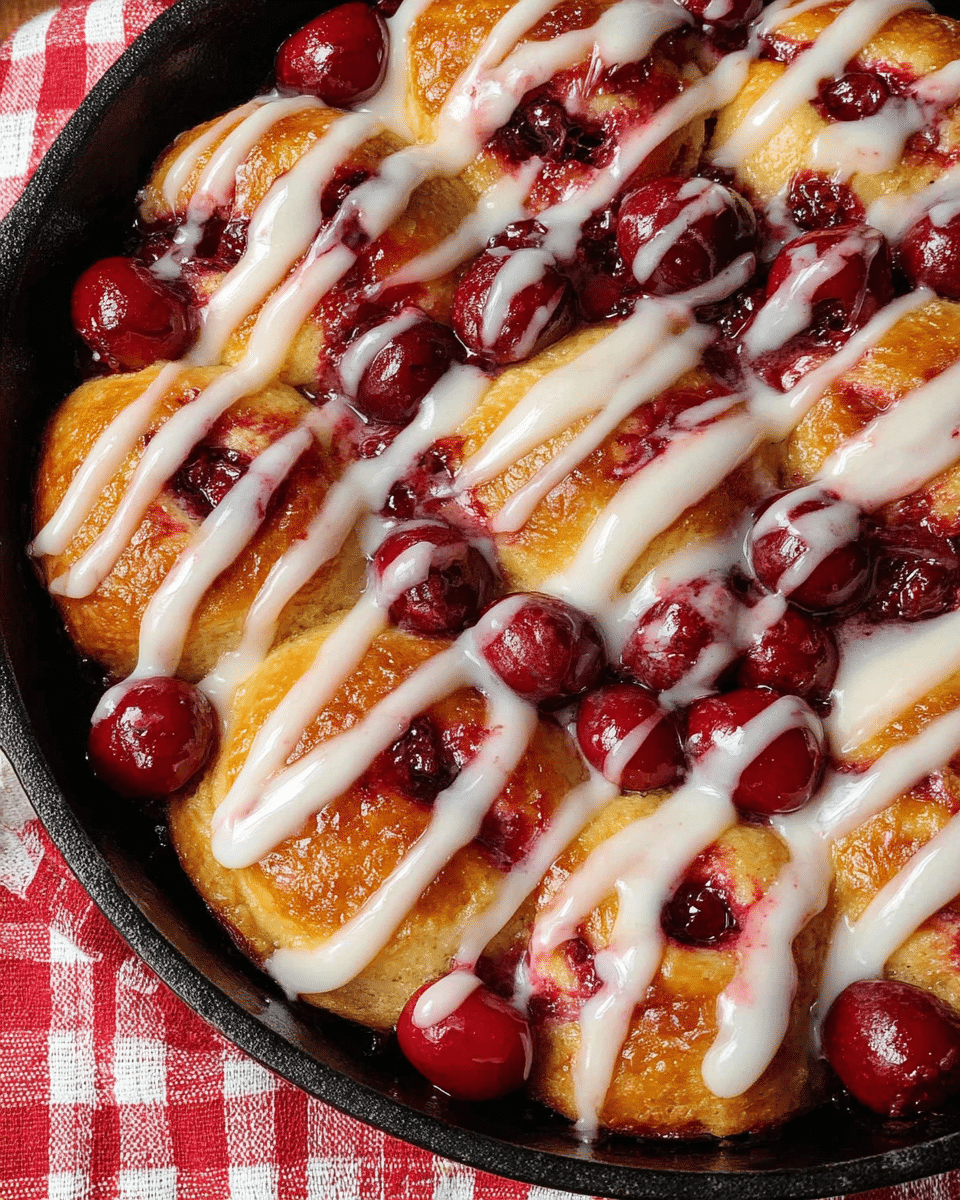
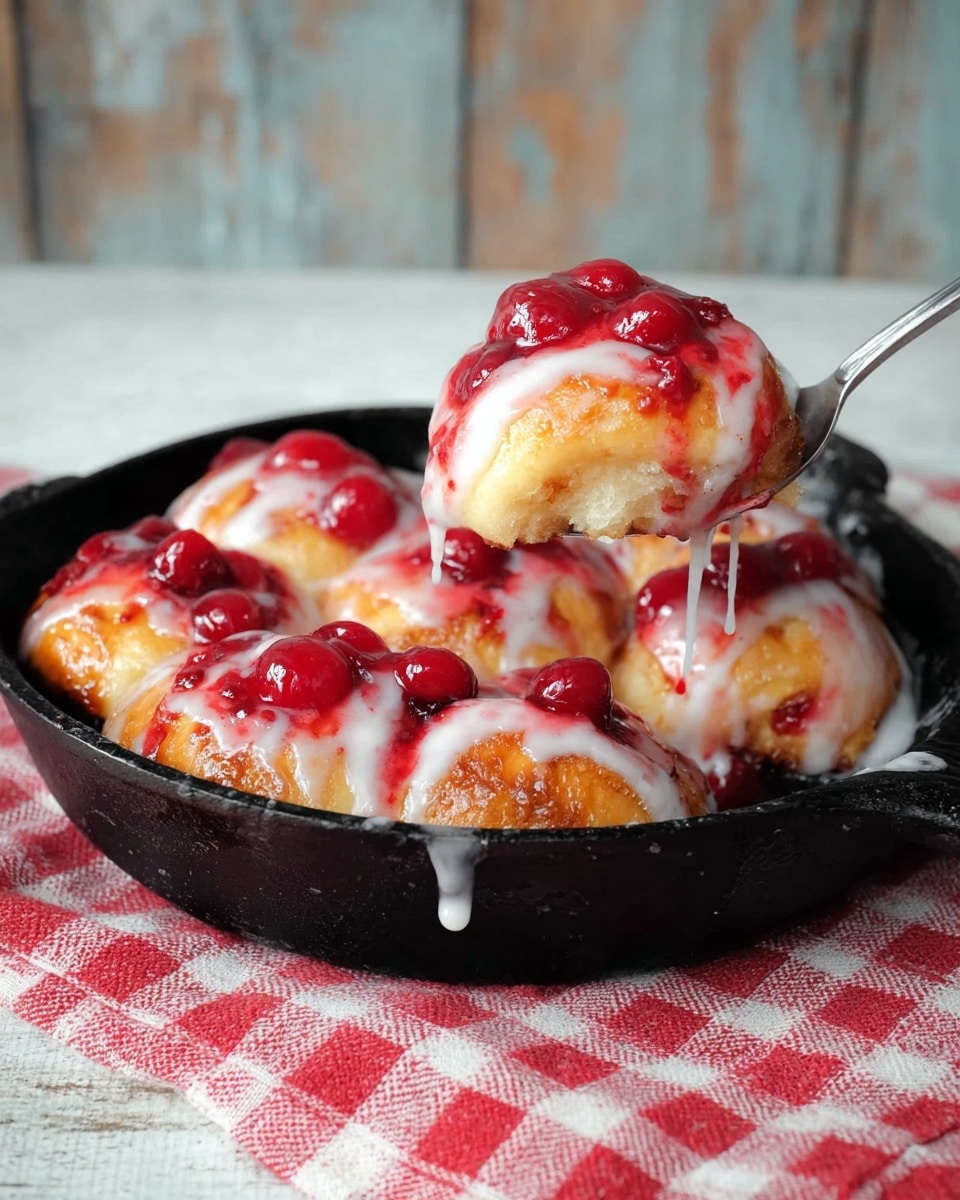
This Cast Iron Skillet Cherry Danish is a delightful and easy dessert that combines flaky biscuits, sweet cherry pie filling, and a creamy vanilla glaze. Perfect for any occasion, it comes together quickly and fills your kitchen with irresistible aromas.
Ingredients
- 1 can flaky biscuits
- 1 large can of cherry pie filling
- 1/2 stick butter, melted
- 1/4 cup powdered sugar
- 1 teaspoon vanilla
- 8 oz. cream cheese
Instructions
- Step 1: Preheat your oven to 350 degrees Fahrenheit.
- Step 2: Grease a cast iron skillet with non-stick spray.
- Step 3: Pour the cherry pie filling evenly into the skillet.
- Step 4: Dip each biscuit in the melted butter.
- Step 5: Place the buttered biscuits on top of the cherry pie filling in the skillet.
- Step 6: Bake until the tops of the biscuits are golden brown, about 15 minutes.
- Step 7: While the Danish bakes, combine the powdered sugar, vanilla, and cream cheese using a hand mixer. Beat until smooth. Add a teaspoon of water if needed to thin the glaze.
- Step 8: Drizzle the cream cheese glaze over the warm Danish and serve.
Tips & Variations
- Use fresh or frozen cherries instead of canned pie filling for a more natural flavor.
- Try adding almond extract to the glaze for a nutty twist.
- For extra crispiness, brush a little extra melted butter on top of the biscuits before baking.
- Serve warm with a scoop of vanilla ice cream for an indulgent treat.
Storage
Store leftover Danish in an airtight container in the refrigerator for up to 3 days. Reheat gently in the oven or microwave until warm. The glaze may need a quick stir before serving again.
How to Serve
Serve this delicious recipe with your favorite sides.
FAQs
Can I use refrigerated biscuit dough instead of canned?
Yes, refrigerated biscuit dough works well and may even give a fresher taste. Just adjust baking time as needed until golden brown.
Can I make this dessert gluten-free?
To make a gluten-free version, use gluten-free biscuit dough or substitute with gluten-free crescent rolls. Ensure your pie filling is also gluten-free.
Print
Cast Iron Skillet Cherry Danish Recipe
- Total Time: 25 minutes
- Yield: 8 servings 1x
Description
This Cast Iron Skillet Cherry Danish is a delightful and easy dessert featuring flaky biscuits layered over sweet cherry pie filling, baked to golden perfection in a cast iron skillet, and topped with a smooth cream cheese glaze. Perfect for a quick treat or special occasion, this recipe combines simplicity with delicious homemade charm.
Ingredients
Filling
- 1 large can Cherry pie filling
Dough
- 1 can flaky Biscuits (usually 8 biscuits)
- 1/2 stick Butter, melted (about 4 tablespoons)
Glaze
- 8 oz. Cream Cheese, softened
- 1/4 cup Powdered sugar
- 1 teaspoon Vanilla extract
Instructions
- Preheat the oven: Set your oven to 350°F (175°C) to ensure it’s at the right temperature for baking the Danish.
- Prepare the skillet: Spray a cast iron skillet thoroughly with a non-stick spray such as Pam to prevent sticking and make cleanup easier.
- Add cherry filling: Pour the cherry pie filling evenly into the bottom of the greased skillet, creating a delicious fruity base.
- Butter the biscuits: Dip each biscuit in the melted butter to coat them fully, which will help them bake golden and add richness.
- Arrange biscuits: Place the buttered biscuits on top of the cherry filling in the skillet, spacing them evenly to cover the surface.
- Bake: Place the skillet in the oven and bake for about 15 minutes or until the biscuits are puffed up and golden brown on top.
- Make the glaze: While baking, use a hand mixer to beat together the powdered sugar, vanilla extract, and softened cream cheese until smooth and creamy. If the mixture is too thick, add a teaspoon of water to thin it out slightly.
- Serve: Once the Danish is baked and slightly cooled, drizzle the cream cheese glaze generously over the warm biscuits and cherries, then serve immediately for a gooey, indulgent treat.
Notes
- Ensure cream cheese is softened at room temperature for easier mixing.
- You can substitute cherry pie filling for other fruit fillings like blueberry or apple for variety.
- Use a spatula to help remove portions from the skillet, as it may be hot and sticky.
- This dessert is best served warm, but leftovers can be refrigerated and gently reheated.
- Adding a sprinkle of cinnamon to the biscuit tops before baking adds a warm flavor dimension.
- Prep Time: 10 minutes
- Cook Time: 15 minutes
- Category: Dessert
- Method: Baking
- Cuisine: American
Keywords: Cherry Danish, Cast Iron Skillet Dessert, Easy Cherry Dessert, Cherry Pie Filling, Cream Cheese Glaze, Quick Danish Recipe


