
World’s Easiest No-Knead Artisan Yeast Bread Recipe
Introduction
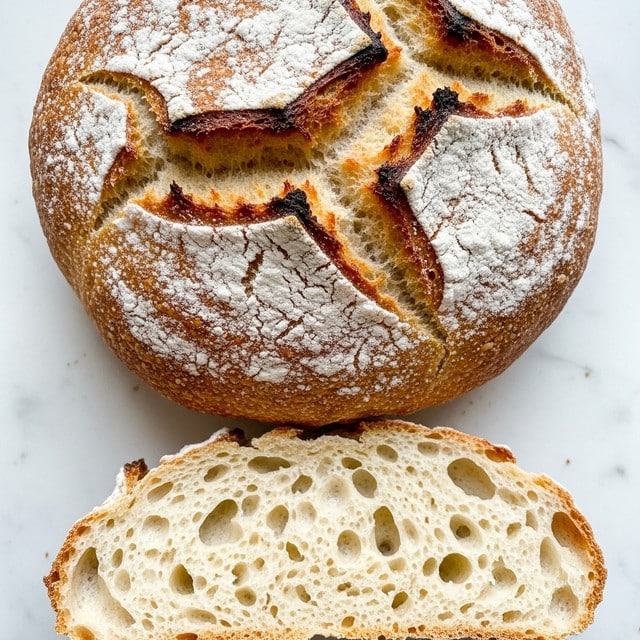
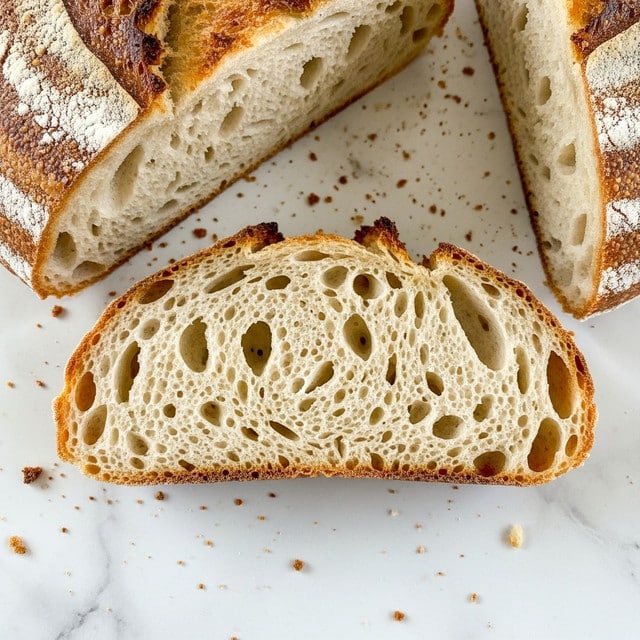
This artisan yeast bread is a simple, no-knead recipe perfect for anyone wanting fresh homemade bread with minimal effort. It yields a crusty, golden loaf with a tender interior, ideal for sandwiches or dipping in olive oil.
Ingredients
- 3 cups (450g) flour (bread or plain/all purpose)
- 2 tsp instant or rapid rise yeast
- 2 tsp cooking or kosher salt (not table salt)
- 1 1/2 cups (375 ml) very warm tap water (up to 55°C/130°F, not boiling)
- 1 1/2 tbsp flour (for dusting)
Instructions
- Step 1: Mix flour, yeast, and salt in a large bowl. Add warm water and use the handle of a wooden spoon to stir until all the flour is incorporated. The dough will be wet and sloppy, not kneadable, but not runny like cake batter. Adjust with more water or flour if necessary for the right consistency.
- Step 2: Cover the bowl with cling wrap or a plate and leave it on the counter for 2 to 3 hours. The dough should double in volume, become wobbly like jelly, and have a bubbly top. If it isn’t rising after 1 hour, move it to a warmer spot.
- Step 3: (Optional) You can refrigerate the dough at this stage for up to 3 days to develop more flavor, or proceed directly to baking.
- Step 4: If refrigerated, let the dough sit at room temperature for 45 to 60 minutes before baking to take the chill off.
- Step 5: Preheat the oven to 230°C (450°F) with a Dutch oven inside, lid on, for 30 minutes. Use a 26cm (10″) or larger Dutch oven.
- Step 6: Sprinkle your work surface with 1 tablespoon flour. Scrape the dough out of the bowl and sprinkle the top with 1/2 tablespoon flour.
- Step 7: Fold the sides of the dough inward about six times using a dough scraper or similar tool to form a rough round shape. This helps deflate bubbles and creates a manageable loaf.
- Step 8: Place a large piece of parchment paper next to the dough, then flip the dough upside down onto the paper so the seam is down. Slide the dough towards the center and reshape gently into a round shape. Imperfect shapes add crunchy ridges.
- Step 9: Carefully remove the hot Dutch oven from the oven. Using the parchment, transfer the dough into the pot and cover with the lid.
- Step 10: Bake the bread covered for 30 minutes, then remove the lid and bake uncovered for an additional 12 minutes or until the crust is deep golden and crispy.
- Step 11: Remove from the oven and cool on a rack for 10 minutes before slicing.
Tips & Variations
- Use bread flour for a chewier texture, or all-purpose for a lighter crumb.
- If you don’t have a Dutch oven, bake the dough on a preheated baking stone or heavy baking sheet and place a pan of water in the oven to create steam.
- For extra flavor, add herbs, garlic powder, or seeds into the dough before mixing.
- Be patient with the rise; a warmer spot speeds fermentation, but too hot can kill the yeast.
Storage
Store the bread wrapped in a clean tea towel at room temperature for up to 2 days. For longer storage, slice and freeze in an airtight bag for up to 3 months. Reheat slices in a toaster or oven to restore crispness.
How to Serve
Serve this delicious recipe with your favorite sides.
FAQs
Can I use active dry yeast instead of instant yeast?
Yes, but activate it first by dissolving in warm water with a pinch of sugar and letting it sit for 5–10 minutes until bubbly before adding other ingredients.
Why is my dough too sticky to handle?
This recipe produces a wet, sticky dough intentionally for airy bread. Use floured hands and surface when shaping, and avoid adding too much flour, which can make the bread dense.
Print
World’s Easiest No-Knead Artisan Yeast Bread Recipe
- Total Time: 2 hours 55 minutes (including rise time)
- Yield: 1 loaf (about 10–12 servings) 1x
Description
This artisan no-knead yeast bread recipe is incredibly simple and perfect for beginners. With minimal ingredients and no kneading required, you’ll create a crusty, golden loaf with a soft, airy interior. The bread is made by mixing flour, yeast, salt, and warm water, allowing a long rise, then baking in a preheated Dutch oven to achieve a perfect crust. The dough can also be refrigerated to develop deeper flavor.
Ingredients
Dry Ingredients
- 3 cups (450g) flour (bread or plain/all purpose)
- 2 tsp instant or rapid rise yeast
- 2 tsp cooking or kosher salt (not table salt)
- 1 1/2 tbsp flour (for dusting)
Wet Ingredients
- 1 1/2 cups (375 ml) very warm tap water (up to 55°C/130°F, not boiling)
Instructions
- Mix Dough: In a large bowl, combine the flour, instant yeast, and salt. Add the warm water and stir with the handle of a wooden spoon until all flour is incorporated. The dough will be wet and sticky, not kneadable but also not runny like a batter. Adjust with small amounts of extra water or flour if needed to achieve this consistency.
- Rise: Cover the bowl with cling wrap or a plate and leave it on the counter at room temperature for 2 to 3 hours until the dough doubles in size and becomes bubbly and wobbly like jelly. If it’s not rising after 1 hour, place it somewhere warmer.
- Optional Refrigeration for Flavor Development: At this point, you may bake immediately or refrigerate the dough for up to 3 days to enhance flavor. If refrigerated, allow the dough to come to room temperature before baking.
- Take Chill Out of Refrigerated Dough: Remove the dough from the fridge and let it sit on the counter for 45 to 60 minutes while preheating the oven so it warms up and rises slightly again.
- Preheat Oven and Dutch Oven: Place a Dutch oven (26cm/10 inch or larger) with its lid inside the oven. Preheat the oven to 230°C/450°F (220°C fan) for 30 minutes to ensure the pot is very hot before baking.
- Shape Dough: Sprinkle 1 tbsp flour on your work surface. Scrape the dough out onto the surface and dust the top with 1/2 tbsp flour. Using a dough scraper or similar tool, fold the dough sides inward about 6 times to form a rough round shape. This helps deflate bubbles and shapes the dough for easier transfer.
- Transfer Dough to Parchment Paper: Slide a large piece of parchment paper next to the dough. Flip the dough upside down onto the paper, seam side down and smooth side up. Slide and reshape the dough into a roundish form; imperfections add to the rustic texture.
- Place Dough into Hot Dutch Oven: Carefully remove the hot Dutch oven from the oven. Use the parchment paper to lift and place the dough inside the pot. Cover with the lid.
- Bake Covered and Uncovered: Bake the dough covered for 30 minutes, then remove the lid and bake uncovered for an additional 12 minutes or until the bread is deep golden brown and crusty.
- Cool Before Slicing: Remove the loaf from the Dutch oven and cool on a wire rack for at least 10 minutes before slicing to complete the baking process and prevent sogginess.
Notes
- Use bread or all-purpose flour; bread flour will produce slightly chewier texture.
- Instant or rapid rise yeast can be used directly; if using active dry yeast, dissolve in warm water first.
- Use kosher or cooking salt for better seasoning and texture; avoid fine table salt which can affect rise.
- Water should be warm but not hot—around 55°C/130°F—to activate yeast without killing it.
- The dough is wet and sticky; do not add too much flour or it will become dense.
- If your kitchen is cool, warming the dough will help it rise better.
- If you don’t have a Dutch oven, bake the dough on a preheated baking stone or tray and spray with water before baking to create steam.
- Refrigeration can improve flavor but requires extra time to bring dough to room temperature before baking.
- This recipe is beginner-friendly and requires no kneading or special equipment beyond a Dutch oven or heavy covered pot.
- Prep Time: 10 minutes
- Cook Time: 42 minutes
- Category: Bread
- Method: Baking
- Cuisine: Artisan
Keywords: no knead bread, artisan bread, easy yeast bread, Dutch oven bread, homemade bread, rustic bread


